Current Grade : C
Target Grade : A
Date : 6th January 2017
Unit 1 grade : C
Target grade : A
Strongest assessment objective : Experimentation
Objectives that need improving : Written analysis
Target Grade : A
Date : 6th January 2017
Unit 1 grade : C
Target grade : A
Strongest assessment objective : Experimentation
Objectives that need improving : Written analysis
Unit 2 Exam - Exam date 24th april and 25th april
I have chosen 3 different exam questions to research and see which one i prefer.
Detail
|
Motion
|
Creative
|

|

|

|
I have chosen the exam question Motion
Photographers can use camera controls to freeze motion and also create the impression of motion. Sports photographers use the camera to freeze a moment in time or to record the blur of movement. John Edmark produced a series of stop motion animations of his sculptural forms called "Blooms". Katy Beverage has filmed intrecately cut paper images on a rotating bicycle wheel to create an animation.
Photographers can use camera controls to freeze motion and also create the impression of motion. Sports photographers use the camera to freeze a moment in time or to record the blur of movement. John Edmark produced a series of stop motion animations of his sculptural forms called "Blooms". Katy Beverage has filmed intrecately cut paper images on a rotating bicycle wheel to create an animation.
Critical analysis of Mark Mawson

|
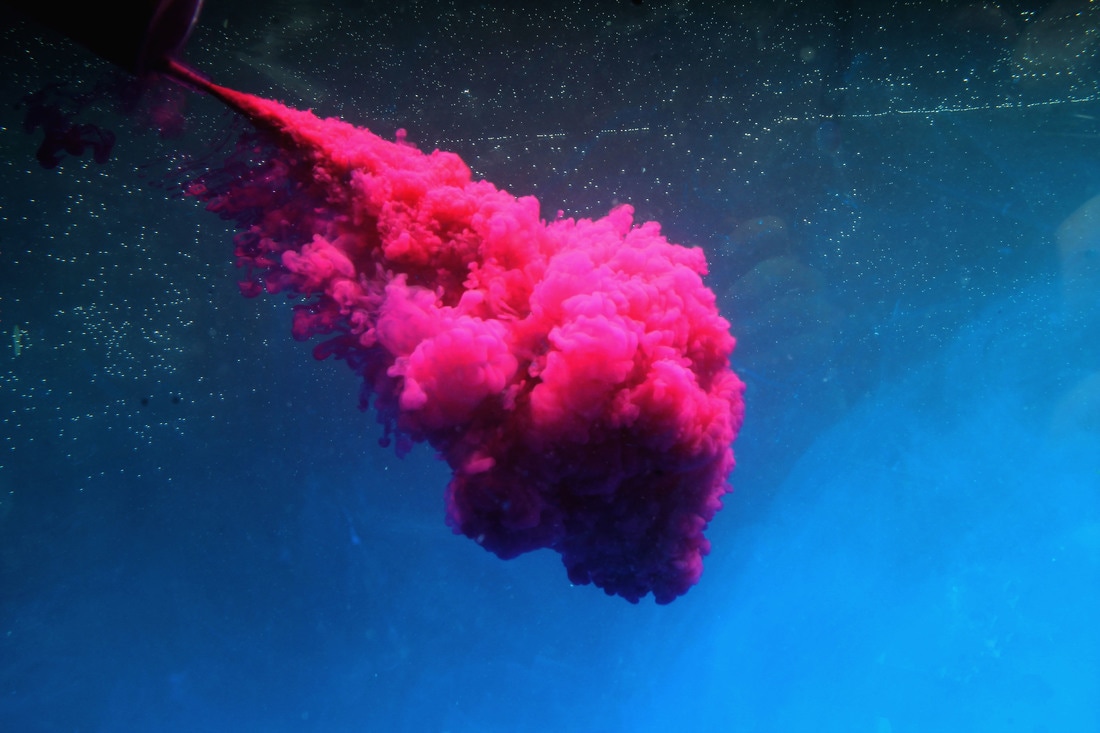
Mark Mawson is a motion Photographer. He lives in London and has had 25+ years experience creating of producing creative and inspiring images. He specialists in shooting liquids and his colorful liquid work, titled "Aqueous", has become very well known and collectible. An Aqueous video was projected onto the walls of Buckingham Palace for The Queen's diamond jubilee concert.
There is multiple colors of ink that have been injected into water giving this image a rainbow and fluffy effect. The lighter colors of ink that have been used in this image have risen in the water more than the darker colors of ink on the edges. Mark has used a black background to give the colors a more vibrant and beautiful effect, if he were to use a white back ground the colors wouldn't be so standing out as they are. Some of the colors have mingled together and created a different color altogether different to the ones mark had planned to create. Mark has used light in a particular way to give shadows on the colorful explosions of ink that have risen the most in the water. The process he has used to create this image is simply injecting some colored ink into a tank of water and capturing the image at the right moment when the ink looks like fluffy colorful clouds. He used some formal events such as color and line. The lines that he hasn't used are interesting, all different shapes ans sizes. He has also used shape in this particular image to create this colorful underwater explosion. The mood of this image is like a happy and colorful mood. This is because of all the colors that have been used in the image are very full and vibrant this gives off the sense of freedom and accepting everything and anyone. |
Photo shoot inspired by critical analysis


This photo shoot is inspired by my critical analyse. I really like this photo shoot because before i started to shoot the ink into the tank i was experimenting with the water bubbles, playing with light to color the bubbles inside of the tank, this worked very well actually. I used lighting gels top change the color of the light shining down into the tank of water. I got a silver jug and simply poured the water inside of the jug into the tank of water so I could take images of the bubbles and hopefully change the color of them. When i was confident and happy with the first experiment i then went onto the final experiment. I got a syringe and then fired the colored ink into the water and placed the camera lens as close as i could to the tank to prevent as much reflection as I could. Then I took lots of images. The second time i fired ink into the tank it was pink, the blue and the pink contrasted very well together which was really good because i wanted that to happen. The third time I fired ink into the tank the color of the ink was white, this experiment did not go very well because at this point the tanks water was already dark blue which made the white ink not stand out very well. There is a lot of visual elements in these images such as color, line, shape and texture throughout each image.
WWW: I experimented well from the bubbles and then moving on to the inc as i have developed my idea to match my artist and also started to capture bright colours like my artist has
EBI: I was not in the reflection of the tank as it distracts from the image, also when editing crop out the tube and start to merge the colors.
Next steps: My next steps will be to not be in the image from the reflection of the glass tank and try to focus on the ink cloud more and also have different colors that contrast just as well as the blue and pink did.
Edit of my favourite image from the previous photoshoot
|
Here i have edited my favorite image from the previous photo shoot. I have increased and played around with layers, levels and contrasts on photo shop. i really like this edit, it almost looks like an asteroid plummeting to the earths surface. I really like this edit because the colors really look well together and there are clearly visual elements such as shape, color, line and texture.
|
Following photo shoot to first photo shoot inspired by critical analysis


|
Here is my second photo shoot that has been inspired by my critical analysis. I really like this photo shoot because i have done what i said i would for my next steps last time. I have not let myself get in the way of the image. I achieved this by cutting a piece of card and putting it in front of the camera so i would not be view able. i cut a hole out of the card so the camera lens can fit inside and take the image. I then squirted 3 different colored bits of ink into the tank and photo graphed them separately. I used lighting again in all the images but i was only using one light source because that is all i needed for this shoot to be a success.
WWW: I really like the colors and the way the ink has formed like a fluffy colorful cloud. The mood in these images depending on the color of the ink is strong. Black is death and or sadness. White is peace and hope. Blue is happiness and freedom. There are clear visual elements in the photo shoot such as line, shape, color and texture. EBI: I were to merge two or more colors into one image and have the different colored ink coming in from all different angles. |

Here io have combined all three photo shoots into one image and made the images all contrast with one another and make them merge into one another. I really like this edit because it gives the image a space look with all the little air bubbles stuck on the inside of the tank they look like the stars and the colors of ink look like super nebula's.
|
Videos with the ink explosions.
I watched these videos on you tube to grab an idea of what to when photographing ink in water. It also showed me what colors to do etc. The second video explains how to do ink drops but i took inspiration from that video and then made it my own with the huge colorful clouds of ink. These helped me very much and made me realise how to photography these ink explosions with the right settings and right lighting and background etc.
Peer Assessment of critical analysis 16/01/17 JL
WWW: You have did really well in talking about the content and context as you have explained in detail what is going on and how he has managed to get there. I think you are working towards a grade B as you have gone into some detail.
EBI: You look into the mood of the photo and how it makes you feel also go into more detail of the process behind the camera and how he has taken the picture and make connections between the context.
EBI: You look into the mood of the photo and how it makes you feel also go into more detail of the process behind the camera and how he has taken the picture and make connections between the context.
My sub theme for this unit will be smoke, inspired by Mark mawson

Mark Mawson smoke photography


All these images are named Untitled
This is only a few examples of mark mawsons smoke photography work that he has produced.
For my sub theme i have chosen smoke. I will be doing my first Photo-shoot in the style of mark Mawson and his smoke work.
I will be getting multiple matches and lighting them on fire to create a long smooth stream of smoke.
I will be getting multiple matches and lighting them on fire to create a long smooth stream of smoke.
Photoshoot 1

|
My first photo shoot didn't go too well because i had trouble predicting where the most accurate place for my match to be set alight and then blown out give off the smoke. I also was unable to focus on the smoke because i put the match too close to the lens.
For my next shoot i will take into consideration the distance to be away from the smoke for me to be able to focus on it.I will also use a product that generates a lot more smoke for me to be able to have a nicer image. WWW: This was the first shoot and it went well. i was able to generate enough smoke for the image to have some smoke in. EBI: If i would have been able to focus on the smoke and make a little more smoke so the image would have looked " fuller ". |
Photoshoot 2
|
|
Here i have used some boiling hot water from a kettle and poured it on the icy cold floor. I wanted to have the same effect of a match being blown out, creating smoke or from a vape. This experiment didn't work out as well as i planned too because the smoke or steam is not as thick as i wanted it to be giving the fluffy cloudy that i wanted. I will act on this by if i were to try this in school again i would get much closer to the steam so i can focus on the steam and get a clearer picture of it.
WWW: This shoot was created by using kettle water and pouring it onto the cold ground to create some sort of smoke or water vapour. i was able to take a couple images with the steam in which is good because the steam is very thin and hardly noticeable if not photographed correctly. EBI: If i were able to make more and smoke and get closer to the steam without the camera getting wet and possibly breaking it also to be able to have more steam for me to capture. |


Photoshoot 3
|
|
This is my 3rd photo shoot. I did this shoot at home. This time i had my mum use her vape and blow it in front of the camera lens, far away enough for me to focus on the smoke. I really like the way this photo shoot ended like because i was able to focus on the smoke more and generate more smoke for the image to look good. I prefer this photo shoot to any other i had carried out because there are many lines and shapes to create a big picture.
WWW: This photoshoot i used a water vapour dispenser, this shoot went very well because I was able to capture the curls and turns of the smoke in a way that in previous shoots i would not be able to. EBI: if i could have focused on the smoke more and gotten closer to it so i could capture more detail and visual; elements such as shape, line and colour. |


Peer assessment
WWW: You have started looking into the critical analysis and have made a clear connection between the photographer and your work both using smoke.
EBI : You edited your images and made sure that the smoke is in focus, try getting closer to the steam as well so you can see it more clearly.
Www: The smoke experiment was a good idea and linked in well with your first photographer. I also like the boiling one with steam, which looks like smoke. Ebi: What happened to the other images of your first smoke experiment? The issue with this shoot was lack of light and the camera was not focused on the smoke. Perhaps put your hand where the smoke will be, focus it and then light the match. Perhaps also with the boiling water shoot you could use different color paper to use as backdrops? Keep trying Harrison. Homework??????
I will act on this in school by using a colored back drop when using the boiling water in the kettle. The homework was unable to be uploaded to my website for no apparent reason. I will buy a USB and put those images onto the USB and bring it in school to upload my second photo shoot. I cant have a vape in school so my main photo shoots will have to be outside of school, but i can use the steam from boiling water, this is not as good when using a vape but it will have to do in school.
GCSE Statement Proposal
Photo shoot 4


|
This is my 5th photo shoot.I did this shoot in school. Sir brang in a mistifier which i used to create smoke. This photo shoot worked very well because i was able to focus on the smoke very well and create a long stream of smoke. These images have lots of lines and shapes. I will edit a few of there images in Photoshop in the style of Mark Mawson. I will double the image and make the reflect one another. I will also make the black background more black and the smoke stand out more.
WWW: This was my fourth photoshoot and it did go as planned. i used the water vapour dispenser again and was able to capture the visual elements that i desired. I used a setting in the camera that turned the images into an orangey/ burnt colour which i think looked pretty cool. EBI: If i were to be able to create known shapes such as circles and or triangles and capture those images and visual elements. |

|
Here i have edited my image on photo shop. I have increased how black the background was, increased how white the smoke was and made the image clearer. I will improve this edit by making a second image of his one and make them opposite to one another by using a specific tool on photo shop.
Second Photographer Stoffel De Roover


Here are 4 images of Stoffel De Roovers work with smoke. They are all named Untitled.
Critical analysis

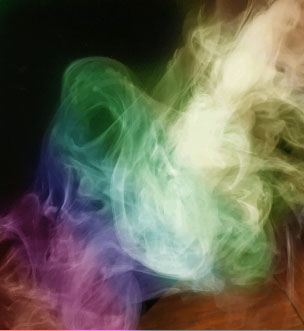
My second photographer is Stoffel De Roover. He is a portrait photographer behind Lumendipity. He lived in Leuven in Belgium and has lived in the Netherlands, US and France before settling down in Montreal. He uses smoke in a such a way where he can make patterns and picture out of smoke for example the image above is titled "A boy with a new balloon", I can see clearly why he named this image that because it looks like a little boy has been given a red balloon, very differently shaped to any other and he seems confused about it.
The style and techniques used in this image are very difficult, he is clearly trying to get a message to through the public who views this image. He has got some kind of item that produces smoke and he has blew it in front of the camera and used Photoshop to edit the colour of particular bits of the image such as the balloon.
I see a young boy like figure of smoke holding a thin string connected to a red deformed balloon, it also seems like the boy is worried he is going to lose the balloon because his mouth is open, this could suggest that he has just lost a string to the balloon meaning that the string connected to the balloon is now a lot thinner. This could be suggesting that nice things in life do not last forver either the boy will loose the balloon and the string will snap or the balloon will deflate and then have no air in it for it to float around.
This piece of work would have been created using a smoke producing product then is being blow in the direction of the lens of the camera and this being morphed or blown into a particular shape, and this shape being a head and a string to a deformed balloon.
There is colour in the balloon and the little boys body, there re lots of examples of lines in the work such as straight lines curved lines and many more, there is also shape in the image like circles and if you look closely there is actually the number 4 on the boys neck and jaw.
I will take inspiration from Stoffel De Roovers smoke photography and add it to Mark Mawsons photography by instead of a stream of smoke i will try to make shapes out of the smoke and make a back story behind each shoot that i create mixing both photographers techniques. I will also edit each image in photoshop, adding colour where it is/ isnt needed to add effect and mood to the images.
I am going to try my hardest to achieve the grade i need to pass this GCSE and take time and care into my work on this website and when i am doing photo shoots, I will also try to do every homework to the standard that i am capable of and take time in editing each image until i am happy with the result.
I am going to try my hardest to achieve the grade i need to pass this GCSE and take time and care into my work on this website and when i am doing photo shoots, I will also try to do every homework to the standard that i am capable of and take time in editing each image until i am happy with the result.

First Photoshoot inspired by Second Photographer


Here i have got my friend to blow a cloud of vape in front on my camera lens not blowing it so hard where it doesn't come up but where it is just right for me to focus on the smoke and take a few images. I got him to let it come out of his mouth slowly so it can form a shape like piece of smoke.
WWW: I really like this shoot because i was able to get some sort of shape in some of these images above. i was also able to make the first image look like a cloud which is what i wanted to happen. i was also able to capture some visual elements such as line, shape and texture.
EBI: If i were able to get closer to the smoke and focus on the smoke more. Create shapes and different colours and textures through the images.
1st Edit |
2nd Edit |

|
|
|
My first edit went very well in my opinion. I really like the ways the colours contrast with one another and how they can blend in with each other. I don't like how bright the colours are so i will change the opacity from 100% to 50% to give the smoke a better and crisper look.
|
Here i have changed the opacity of my first edit from 100% to 50%. I prefer this edit because you can see the smoke clearer than before and the colours seem to blend in with one another better. This edit you cant see the lines from where i have changed colours where-as the first edit you could.
|
2nd Photoshoot inspried by my second photographer


Here i have my second shoot in the style of my second photographer. I have got a black background ( curtains and t.v ), a vape and my friend has blew a cloud in-front of the camera. I had to use my phone for this shoot and because of that the images are not very good. I am not particularly happy with this for a few reasons. 1 the smoke is not in focus. 2 only one of the images seem to look like in the style of my second photographer ( 3rd one, in the corner there is a smoke ring ). 3 the backgrounds are not supposed to be lit up only the smoke, this was because of the flash that i had to use during this Photo shoot. I will avoid these hurdles next time by using a proper camera and get my friend to blow better clouds and do better tricks so the image will better.
WWW: i really like how the way some of these images look, preferable the ones where the background is black. I like the 3rd image because in the corner there is a smoke ring, i also like the images because of the flash, the flash reflects off of the smoke which makes the smoke look whiter.
EBI: First of all i would like to have more smoke and be able to focus on the smoke more. I was unable to do this because my camera on my phone is not very good and cannot focus on things, secondly i would like for the back ground to be all black and not have any light reflecting off of the background. i would also like to have more visual shapes and elements, this is the idea that i have set my mind on for my final shoot.
Teacher Feedback
March 2017
Teacher Feedback AO2: Experiments March 2017 Grade: E
Www: Harrison, I love your enthusiasm when you talk about your work in class. You have shown some interesting experiments with smoke and adding colour to this.
Ebi: You need far more experiments with the smoke techniques, as discussed you could look at controlling the smoke and look more into using light and smoke in a variety of different environments. You can do this by doing 3 different locations when you are able to.
Student response.
I am going to be doing and uploading lots of different techniques with smoke onto my website. I will also be using light in various ways to give my image its best look. I am having issues with uploading my images onto my website, also my friend that helps me with the photoshoots isnt always free so it is hard for me to find a time where i can do a photoshoot and for it to be successful.

|
Here i have edited a old image in photo-shop, i thought it was a good idea to try this and experiment with the software, i have watched lots of you tube videos on how to make smoke photography look nice in photo-shop. I have inverted the color so i don't have a black background i have a white one now, i like the way it looks with the colors inverted. I have simply played around with the hue and saturation, the levels and opacity to create this turquoise colored line of smoke. I also added a gradient and shadow to the image as you an see there are black bits or dark bits in the trail of smoke.
|
For my final shoot/ final ideas i want to achieve a photo shoot where there is lots of smoke rings and another image of a stream of smoke. I will edit one onto the other in photo shop and then have the stream of smoke in the center of the photo and add a gradient to the smoke and then have the smoke rings on the edges of the stream surrounding it, i will have the rings multiple different colors, fading into one another such as red to orange etc. The rings will be different sizes and slightly different shapes. The narrative of this image will be the stream meaning the strong parent and the rings will be the children and young adults, staying close to keep safe but as the grow older they no longer need the guidance of their parents so they drift away leaving the guidance of their parents.
Photoshoot 3
|
|
Here in this photo shoot i have used incense sticks to create a nice trail of smoke for me to be able to capture in the studio. I have used a black background to really let the smoke have its own color and texture. I did this by simply not letting any light onto the back ground and used a piece of paper to direct where i want the light. I also really like this photo shoot because i can see lots of visual elements such as shape, line and color. In the first image i can clearly see that there is a S in the smoke, i did this not intentionally wanting to create a letter but having the camera set on a timer and then wafting the smoke away from the camera to try have some control of how it moves.
WWW: I really like this photo shoot because it has some shapes in. I was able to have little control of how the smoke moved from the incense stick which i really liked, i was also playing with light and moved the lights into different places. EBI: If there was some color to the smoke not just plain grey or white and if there were more shapes in the images that the smoke will form. My next steps will be to cover the lights with some lighting gels so i can make the smoke have a different color. |


Final ideas Mindmap

Final ideas project proposal.
For my final shoot/ final ideas i want to achieve a photo shoot where there is lots of smoke rings and another image of a stream of smoke. I will edit one onto the other in photo shop and then have the stream of smoke in the center of the photo and add a gradient to the smoke and then have the smoke rings on the edges of the stream surrounding it, i will have the rings multiple different colors, fading into one another such as red to orange etc. The rings will be different sizes and slightly different shapes. The narrative of this image will be the stream meaning the strong parent and the rings will be the children and young adults, staying close to keep safe but as the grow older they no longer need the guidance of their parents so they drift away leaving the guidance of their parents. I may alsop have some liquid photography in the centre of the image, like have a tank full of water and squirt ink into the water and take a picture, this would create an explosion of color, shape, line and texture.
Photo Shoot 4


This is my 4th photo shoot in the style of my second photographer, i believe that it has links to my second photographer because there lots of visual elements in each image such as color, shape, line and texture. I was able to create these smoke rings by simply getting a incense stick and pushing it up and down. I used lighting gels to make the light green as well. I tried not to get any light onto the background so all the focus will be on the smoke rings instead of the background. The last image of the photo shoot i tried getting two different colors of light on the smoke ring but it did not really work.
WWW: The smoke rings actually have shape to them and they do look like rings which i love. I was also able to create the smoke green by using lighting gels which i also really like. I was also able to focus perfectly on the smoke so the image looks a lot crisper.
EBI: In some of the images I didn't get the incense stick in the way and had perfect rings each time.
My next steps will be attempt and try and control the smoke so i could have one ring going into another maybe. Also have two different colored lights lighting up the smoke so the one color merges into another one.
Final Edits

|
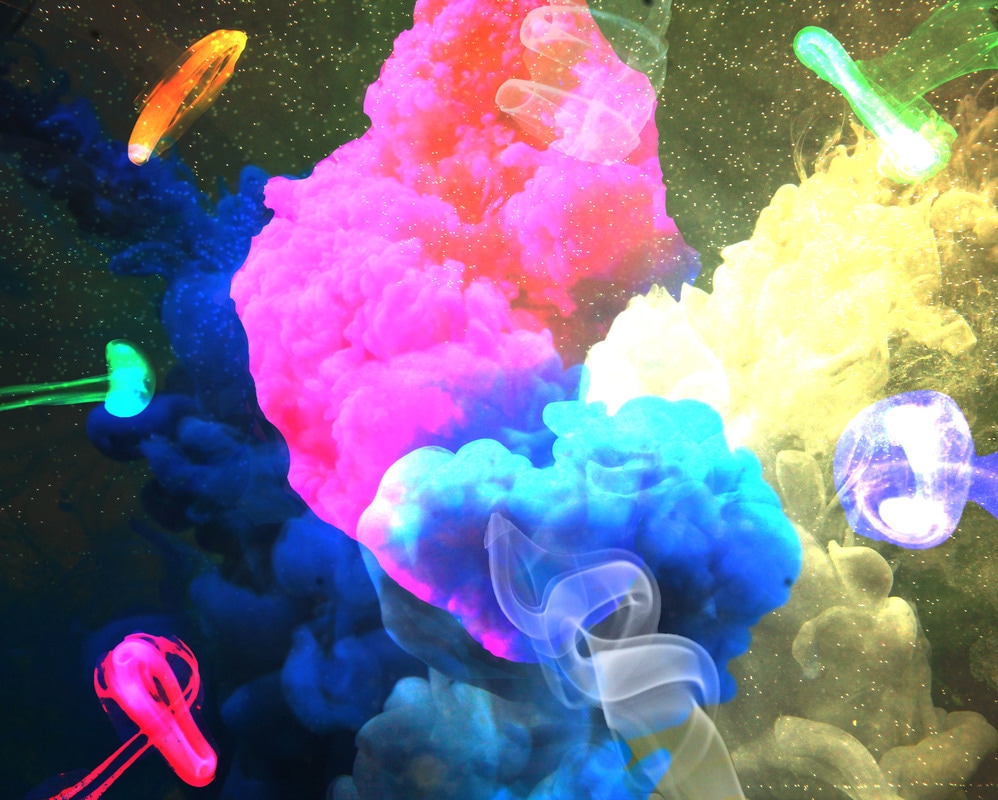
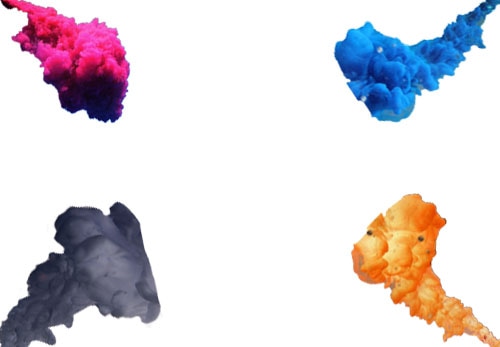
This is only one of my final edits that i will be doing. This is the first edit and i didn't expect it to be very good. What i have done is put a couple of the water explosions onto the same picture and layered them up to look like there is a different color ink explosion coming from different angles and places. my next steps will be to increase contrast of colors and make the shapes more interesting and the image more interesting.
|
|
This is my second final edit. I decided that i preferred the water and ink explosions to be coming out from the corners rather than the sides. In my future final edits i will be adding elements from both my photographers work in the final edit. My next steps will be to add a background maybe, like a stary night or a plain black background.
|
|
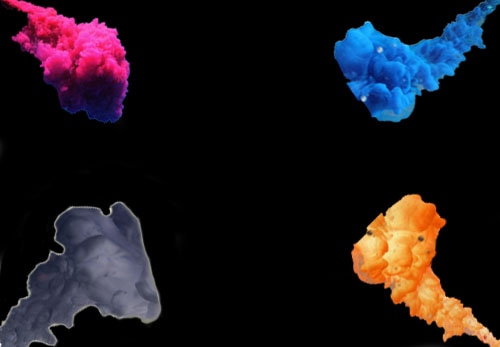
I decided that i did not like the white background so i changed the background to black and i have tidied up the edges on each ink explosion. I will add the smoke rings to the next edit. My next steps will be to hopefully combine these ink explosions into one another making them meet in the center of the image making that the center point of focus. I could also add my smoke rings into the picture starting to link both photographers techniques into one image.
|
|
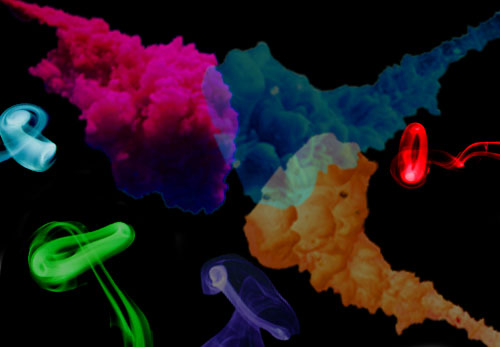
Here i have started to combine each of the photographers styles into one image. I want the ink clouds to be overlapped on themselves so i can make an image like i have in the past and then add the other elements of my other photographers work. I will overlap each ink explosion to make it look like a huge explosion of color. My next steps will be to make the ink explosions more crisp and clear because right now they are quite blurry.
|

|
Here i have overlapped each ink explosion that is going towards the center of the image which is where the most amount of color is. This automatically is the first thing any audience will see because it is the center point. I like this edit because it shows the color and fluffiness of the clouds which i intended it to be like. My next steps will be to add the smoke rings into the image therefor linking both photographers ideas.
|